Many researchers would like to publish their articles openly in the University of Helsinki’s digital repository Helda, but don’t know how it happens. No fear, it is not difficult at all! In this blog text we will show you in plain language how everybody can self-archive their articles (publisher’s policies permitting) in few minutes. This is the third part of Think Open blog’s article series on self-archiving. [Updated 28.11.2021]

(Tämä artikkeli on saatavilla myös suomeksi.)
Self-archiving takes place in the University of Helsinki in the following way:
1. Give information of your article
You can start the self-archiving in Tuhat-portal. Log in with your UH credentials. Choose add content from top right column, then research output and the relevant option (article, article in book etc.). A template opens to which you should write the information of your article in as much detail as possible.
If you are adding an open version of your article to an already filled template in Tuhat, you can jump straight to the next step.
2. Check publisher’s policies for self-archiving
Each journal and publisher has its own own policy concerning self-archiving. They should be followed in both self-archiving to Helda and archiving to academic social media platforms, such as Academia.edu and Research gate. The policies of the publishers and journals can be found in their web pages, but more easily from a database called SHERPA/RoMEO. You can search by journal name or publisher (relevant in self-archiving book articles) and by ISSN number. Sherpa/Romeo will tell you clearly your rights to self-archival. Let us look at the example below.
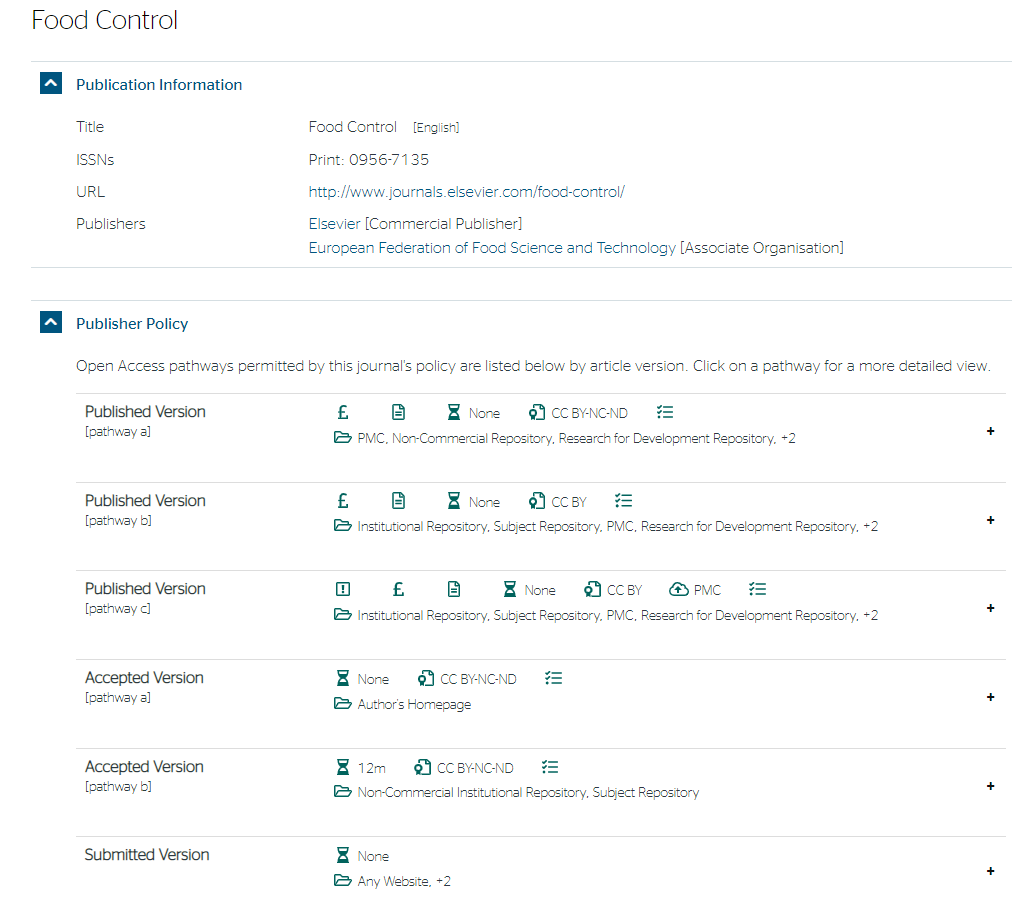
In the example above the Sherpa/Romeo informs you that the author can in journal Food Control freely archive a preprint-version of the article (in Sherpa/Romeo, Submitted version) (of article versions, see the previous part of our blog series). One can archive a post-print-version (the draft version after peer review-process, in Sherpa/Romeo Accepted version) to a non-commercial institutional repository such as Helda with 12 month’s embargo and with a license CC BY-NC-ND. The author can archive the same draft verson to one’s own homepage without an embargo, but with CC BY-NC-ND-license.
There are separate rules for archiving the publisher’s version. It is possible only when an article processing charge (APC) is paid. This applies to both institutional and other non-commercial repositories.
There are instructions to the use of Sherpa/Romeo and explanations of the symbols used in here.
Note also that if there are several authors, make sure that all agree on self-archiving of the article.
3. Add the full-text to the Tuhat-template
Let us assume that you would like to self-archive a post-print-version of your article. This can be done in the same template you have already used, in point ”Open Access and other versions; files, DOI and links”. Click ”add file (self-archive)” and then ”upload file (self archiving)”. After this, a new template opens and you can either drag the file with your mouse or browse to find the right file and add it to the template. Write the title of the file (it can be the title of the article or a shortened version of it) and choose ”accepted author’s manuscript” as article version (in the example case; you can also choose other versions, such as preprint at will).
After this, choose the access to electronic version in the next point. If the publisher allows immediate open access to your self-archival, choose ”open”. If the publisher requires an embargo for the article, choose ”embargoed” which means that your article will be opened after a certain delay.
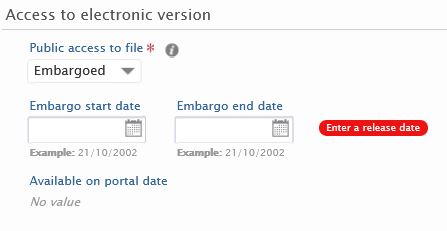
The embargo is set in the same point. Just fill in the date the article was published online and then add the date the embargo stops (for example, six or twelve months). When the embargo ends, your article will be automatically transferred to Helda repository. Therefore you need not remember when to self-archive your article: you can do it right after it has been published online. The experts in the library will check your self-archiving and add additional information if needed. After your article has been transferred to Helda, it can be easily found by search engines, such as Google and Google Scholar.
When the embargo ends, your article will automatically transfer to Helda-repository. Therefore you need not remember when to self-archive your article: you can do it right after it has been published online.
4. Add DOI
The article is often given a persistent identifier (Digital Object Identifier, DOI) by the publisher. This identifier is unique and you can find the article easily with it. It is useful (and often required by the publisher) to add the DOI to Tuhat, so that those interested of the self-archived version of the article can easily find the published version (for reference purposes, for example). This takes place in the same template as before: go to ”Open Access and other versions; files, DOI and links” and choose Add DOI. Fill in the DOI (for example 10.1007/978-94-007-7131-4_5), the document version (in this case ”final, published version”) and in ”Access to electronic version” choose ”closed”, as the published version is behind a paywall. In this template you can also add a Creative commons license if that is determined in the journal or in SHERPA/RoMEO database. In other cases it is left unspecified.
Note that University of Helsinki recommends self-archiving also those articles that are published in open access journals or as hybrid-articles. The purpose of this is to create a complete digital archive of research in University of Helsinki. It is possible that a journal is terminated and the articles lost. UH digital repository Helda is a safe, long-term digital archive maintained by the university.
Final Words
That’s all, folks! Once you have self-archived a couple of articles, the process is easily remembered. In case there are gaps in the memory or other difficulties, you can see our research guide. You can also check out our video where the process is run through.
In case you get stuck in some point or just do not have the time, you can also use a self-archiving service of the library where the information specialists do the self-archiving on your behalf. You only need to send the information of the publication and all the article version you have to the address openaccess-info@helsinki.fi. You can also send older articles to be self-archived, although the newest articles are archived first.
If you need someone from the library to show you or your unit how the self-archiving is done, write to the same address (openaccess-info@helsinki.fi).
Articles published in this series:
- Self-archiving is a free way for researchers to carry out open access publishing
- Which version of the article can I submit to the digital repository?
- Four small steps – how to publish your paper openly in Helda repository
- Better visibility, more impact – and six other advantages of self-archiving
- Support for self-archiving from the library
- Two-point checklist about self-archiving for University of Helsinki researchers
- How and why I self-archive – four researchers report their views